Schedule Management
Complete this step if you want the user to have a schedule on the appointment screen (eg. practicing doctors, residents, nurses, not receptionists).
SCHEDULE SETTING
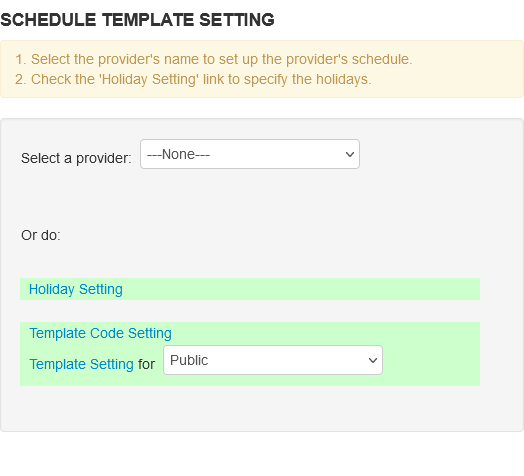
The template settings can be as complicated or as simple as your office requires. There is one default schedule in the system and it must be applied to each provider in order for them to show up on the appointments screen.
- Click on the ‘Schedule Setting’ Link under the Schedule heading.
HOLIDAY SETTINGS
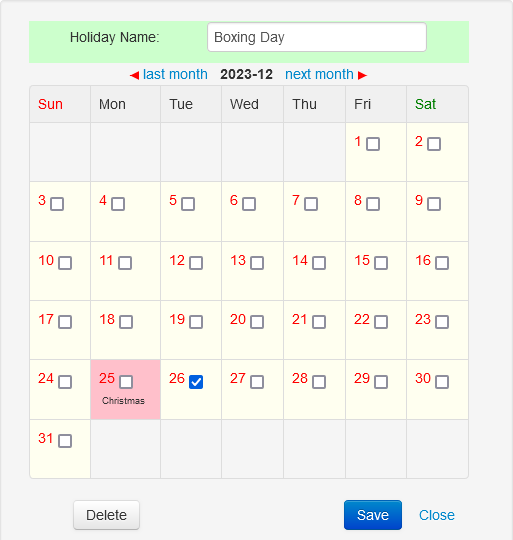
Holiday Setting enables you to indicate recognized holidays and name them on the calendar. This information will be accessible to all users.
A separate public template for booked holidays will need to be developed and used on individual schedules.
TEMPLATE CODES AND DAY TEMPLATE SETTINGS
Template Code Setting

Assign a one-character code letter or number and a description of less than 40 characters. The duration of each code unit is in minutes and html code is used for the background colour.
- The code is a one character number or letter to designate the booking slot
- Description is the long description that appears to help you select the correct code
- Duration in minutes
- Color is the colour that you will use to highlight the code. Click the palate to pick a color or use one of the web color names.
- Booking Limit is the number of simultaneous appointments allowed in that slow
- Limit type allows you to turn the limit off, set the Confirm Warning for bookings above the limit, or alternately set the Same Day, Same Week or Urgent Care limits for that appointment slot
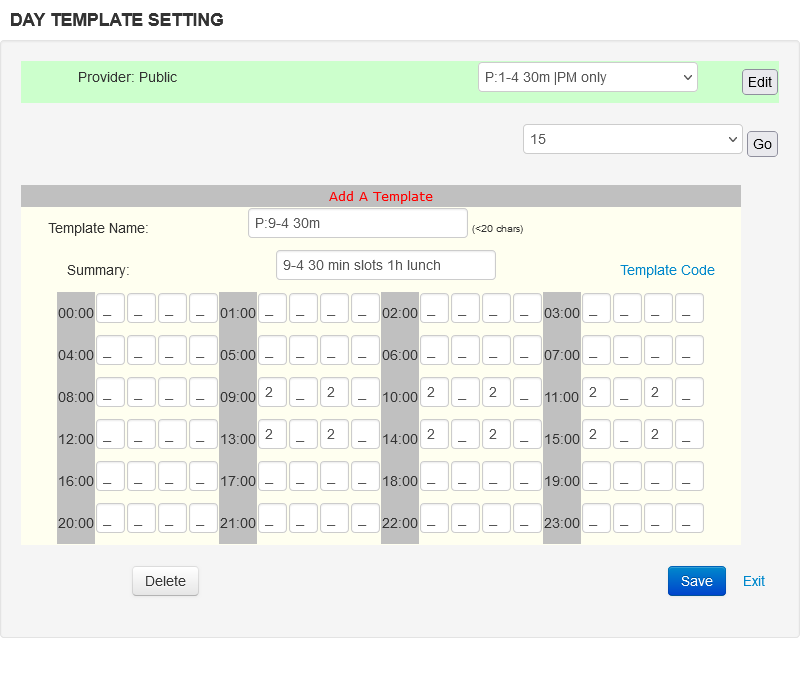
Template Setting
- Select Template Setting for Public or Provider templates from the drop-down menu. Public templates are automatically designated ‘P:’ and will develop templates available to all users when setting up personal schedules. Personal templates remain available to the designated provider only.
- Name the template to reflect the day’s schedule. This information will be visible on the “Month” tab calendar only. Summarize the template (i.e. Provider Name – Monday). A template with the same name will overwrite the original template.
- Assign appropriate template code to 15-minutes time slots (default) or any other time schedule based on the dropdown corresponding to provider’s schedule.
- Click in the block and tab or shift-tab to add and delete code.
- Save completed template.
- The template will now be available on drop-down menu to edit or delete as necessary within the respective Public or Provider’s template setting area.
- Exit when all templates for one Provider are done.
NOTE: A template will not appear on the appointment screen once the date range for the template has exceeded one year. If the template is remaining the same, a new template with the start date at the current day needs to be set.
MEANING OF SAMPLE CODES
This is available if you hover over the Template Code link in Day Template Setting
  A Academic (paperwork etc)
  B Behavioral Science
  C Chart Audit Rounds
  D Department Meeting
  E Study Leave
  H Hospital
  L Lunch
  M Monitoring
  P Phone Calls
  R Rounds
  V Vacation
  U Urgent
  t Travel
  a Administrative/Education Duties
  m Meeting
  s Same Day Appointment
  W Same Week Appointment
  1 15 Minute Appointment
  2 30 Minute Appointment
  3 45 Minute Appointment
  6 60 Minute Appointment
SETTING UP A SCHEDULE
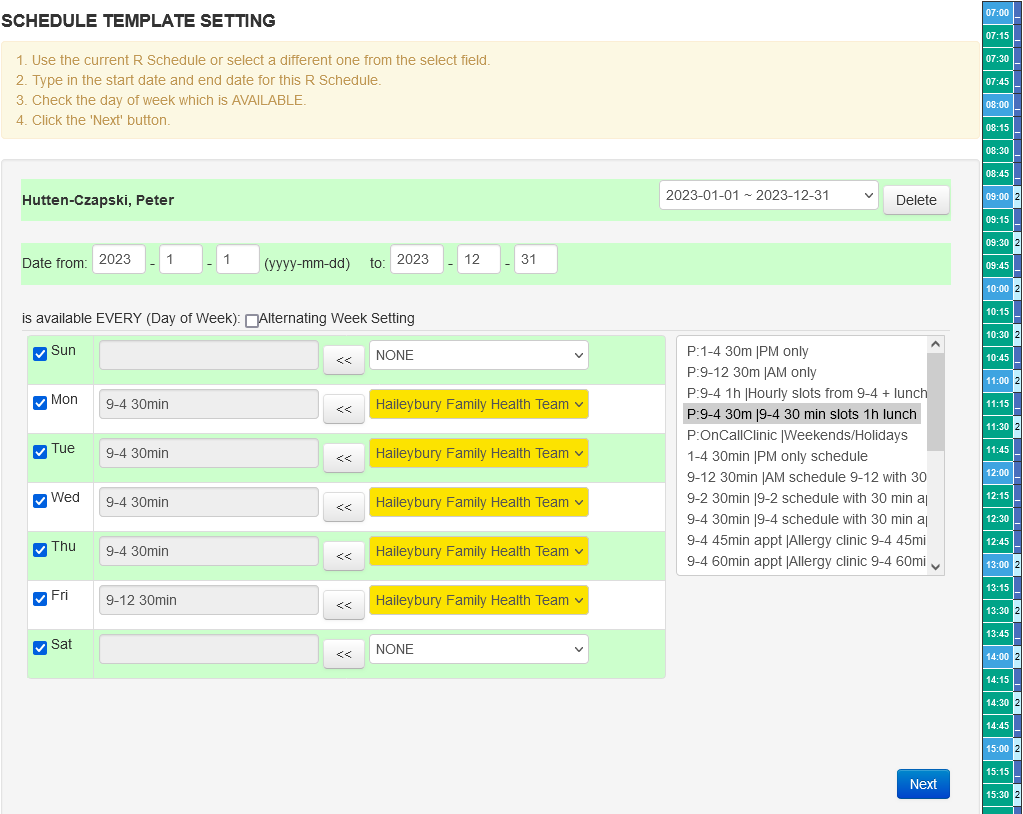
- Select a Provider from the drop down menu under ‘Select a Provider’ in order to set up the schedule using the templates you have developed.
- The new window will show the provider’s name in the upper left corner of the screen
- Specify a start and end date for the schedule.
- Check off the days of week that the provider is available
- For multiple site clinics pick the location for that provider for that day
- Transfer prepared templates by clicking on the template name and then the arrow beside the appropriate day
- Alternate Week Schedules: Click on if applicable, before transferring template information to schedule. This would be used if the provider has a schedule that alternates every two weeks on the same cycle. Transfer prepared templates to all applicable available days.
- When you have filled in all the appropriate days, click the “Next” button to save and view the schedule in calendar view.
- NOTE: The effective dates are the only ones that will actually appear in the provider’s schedule, although the template names appear on all calendars.
- TIP: Concurrent schedules will need a new start and end date or the current R Schedule can be extended by the end date. Never change the start date of the current R Schedule. Each additional schedule will be added to the drop-down menu of available schedule fields.
- An illustration of the template appears to the right of the window for reference
UPDATING A SCHEDULE
- When schedule updating is required for specific dates, select the appropriate schedule field containing these effective dates and modify. Click ‘Next’ to advance to the calendar view of the schedule.
- Click on the appropriate calendar date (use arrows to advance calendars) to be changed
- Replace the current template with the appropriate Public or Personal template from the drop-down menu.
- If the schedule change needs to revert to the original or an error was made selecting the correct date for a change, click on the date to be updated and click “Delete” to return the schedule to the original template.
- Temporary changes to a template over a longer period of time or ongoing changes can be made by specifying the start and end dates to create a new schedule field and copying the appropriate templates for that time period.
- New templates can replace old templates. Alternatively, a minor change to the same template in the Template Setting area may be sufficient.
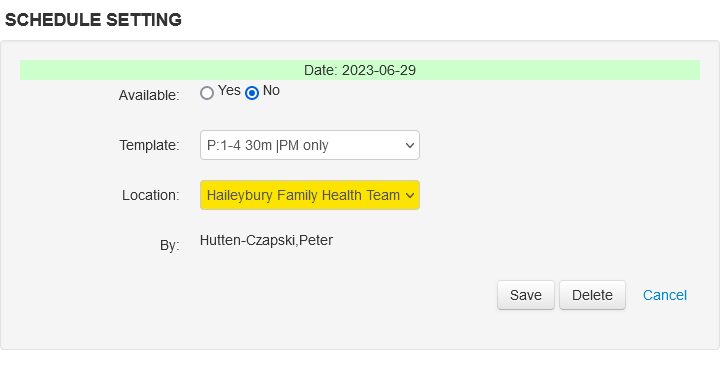
SINGLE DAYS

- When you get to the calendar view of the process you can now select individual days that the provider will be ON-CALL or not available
- The provider can be made “available” (will show on Schedule View) or “not available” (will show on View All only). Save to update.
- A colour change to yellow on the schedule setting calendar indicates a template change and provider is available.
- A colour change on the schedule setting calendar to dark blue indicates a template change and provider is not available.
- Pink dates are holidays but can be booked unless explicitly set as not available
FINISHING

- Click “Next” to save changes.
- You have finished one Schedule Setting successfully.
- Click the “Do It Again” button to go back to the first schedule page and do another provider’s schedule.
- Choose next provider for template setting.
- Click the “Finish” button to exit the window.
SEARCHABLE SCHEDULE
If you want the schedule to be searchable, there is a particular order that should be followed. In order to search a schedule, there is a small [S] box that appears to the left of the provider name, in the appointment screen.
You will need to create a provider day template for each different schedule. (eg. If a provider works from 9:00 to 17:00, with 1 hour off for lunch on Monday/Wednesday/Friday and 9:00 to 14:00 with no lunch on Tuesday, you need to create 2 day templates).
1. On the last ‘Template Setting for Public’, pull down the provider name and click on the ‘Template Setting’ which is just to the left.
You will see the ‘Day Template Setting’ screen.
a. Select the slot duration you want [5/10/15/20/30] then click Go. The body of the day template should have the correct number of slots.
b. I use the following format for the Template name: LF from-to where L is the provider last initial, F is the provider first initial and the from-to is the duration of the schedule. You have a maximum of 20 characters, so keep it short. (eg. WE 0900-1700)
c. Enter a detailed description on the Summary.
If you hover over the blue ‘Template Code’, you can see the available choices. You can add more using the Template Code Setting (see above).
d. Within the available time range, enter a code for each slot that you want to make bookable.
If the availability starts at 09:00 and ends at 17:00 with a 1 hour lunch at noon, enter a 1 (15 minute appt) in each of the boxes from 09:00 to just before 12:00 and then in each box from 13:00 to just before 17:00. There should be 7 x 4 (28) 15 minute slots.
e. Save to save the Day Template.
Now, you can ‘Select a provider’ at the top of the Schedule Template Setting screen.
2. You can enter the from/to range (not more than 2 years).
Note: For Specialists with very limited schedules, you can enter a single day as the from/to range.
a. In the right window, you need to find the provider day template(s) you just created (that’s why the LF 0900-1500 format is useful) and apply it to the appropriate day(s) of the week. If you have 2 day templates, make sure to apply them to the correct days of the week.
b. Click Next to continue and then Finish to end.
APPOINTMENT STATUS
Appointment Status Setting allows you to adjust the colours that the patient appointment can go through as the patient is processed
The Enable/Disable links toggle if that code is used
After you click on the Edit you have the option to change the code and its background colour
- The colour can be edited manually or you can use the picker by clicking the palate icon.
- Click on the colour slider on the right to get the base colour and then click and drag on the middle of the palate until you have the hue
- Click OK to load that colour into the New Bg Colour text box
- Then submit your changes
APPOINTMENT TYPE
Form preset appointments with common preset reasons for the receptionists to use
- The Name is a short descriptor for the receptionist to pick from
- Duration of the appointment in minutes
- Reason is what shows as the ‘reason for visit’ for the appointment and for the associated encounter heading
- Notes are for the secretary
- Resources might be what resources you need for the appointment such as equipment, a particular room, or staff
- Location is relevant in multi-sites Oscar clinics
Add a Group

Allows you to select members and assign them to a new group that shows in the schedule. Name the group and check off its members from below. This group will be accessible from the schedule screen.
Search/Edit/Delete Groups

Allows you to edit and delete groups and their members. The include/exclude Inactive Providers button will allow you to see providers that are inactive that are members of a group.
Access Control

By default all providers can see all groups. This can be customized to allows access control that varies by grouping.
Add/Edit Group Preferences

Allows you to set default billing forms for a given group. This will set (for instance) a billing form for Nurse Practitioners as a default for NP’s. The individual user will always be able to set an alternate form in their user preferences, or access any other billing form as needed.
Prevention Notification Settings
Allows you to set which prevention notifications do you want to be displayed on the schedule screen.
Display Settings

Here you control the Schedule appearance.
- Classic Schedule has the traditional OSCAR schedule replace the new one
- Eyeform is a specific charting module for ocular professionals
- Intakes can be done from the appt screen if desired
- Names can be abbreviated on screen
- By default if the provider is not scheduled for the day those days will not show in week view
- Receptionist alternate view
- Appointment Type and reasons can be shown
- Alerts can be shown (as A link prepending the patients name)
- Notes can be shown (as N link prepending the patients name)
- The Calendar selector can be either a large or small format TIP the small is mobile friendly
- Quick Date selector with fixed intervals can be shown
- Quick Date selector with multiplier can be shown
- Appointment Type can be shown on schedules
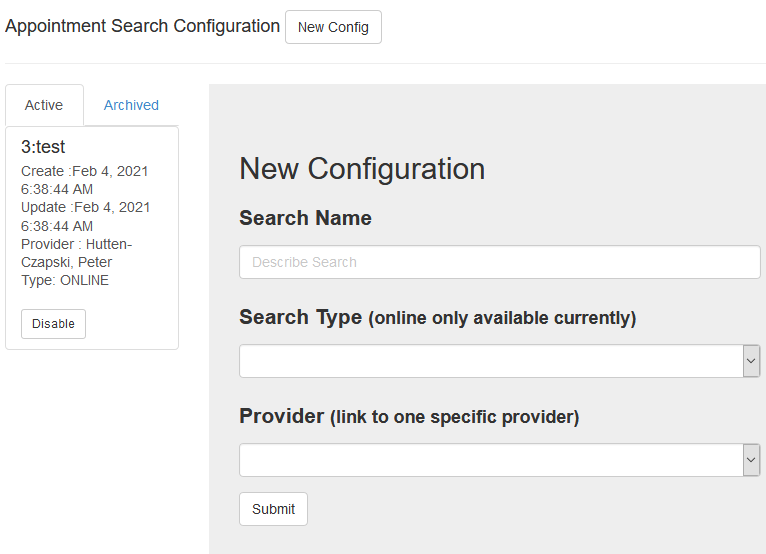
Appointment Search Configuration
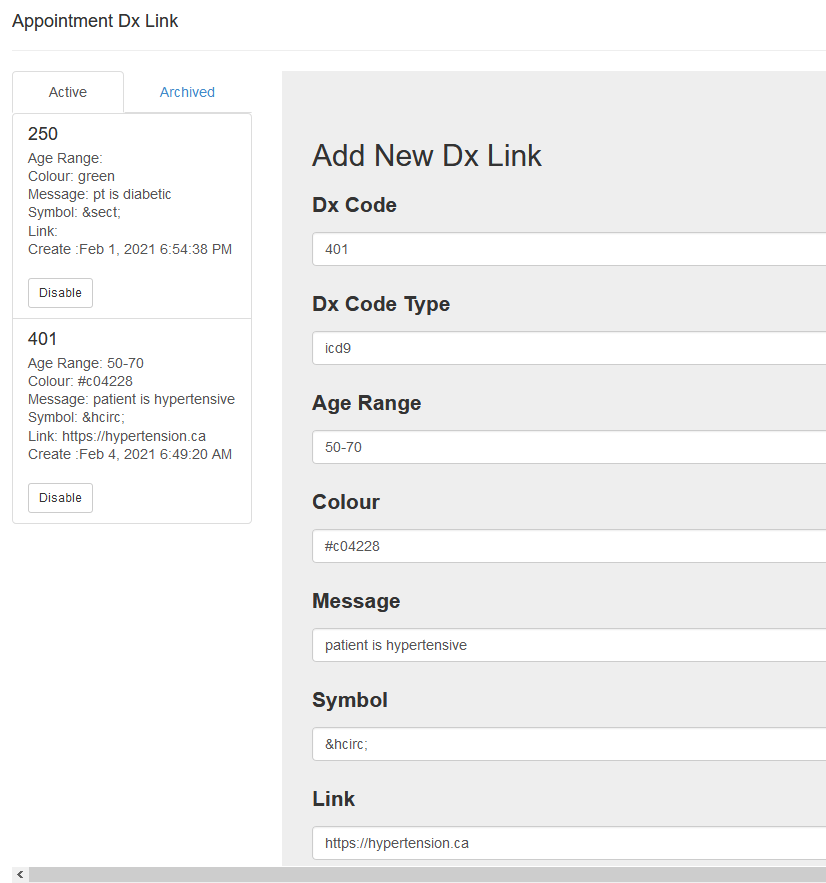
Appointment Dx Link