
Data Management
- Log in to OSCAR with a user that has admin rights.
- Navigate to Admin > Data Management
- Click the “oscarDatabase/Document Download” link. You will see something like the following

Click the file names to save the files to the local computer.
There will be four types of file present
- the backup.log is a plain text file that logs running of the backup. If things are not running check this file first for errors.
- the largest files are Full backups such as Full.OscarBackup.oscar_15.2019-09-22-23:01:01.tar.gz.enc
which are a complete backup of the oscar database, oscar.properties file, ministry files, HRM, eform images, documents, the OSCAR program itself… - the document backup that has the newer documents to date since the full backup OscarBackup.oscar_15.2019-09-23-23:01:02.Document.tar.gz.enc
- the database backup such as OscarBackup.oscar_15.2019-09-23-23:01:02.Database.tar.gz.enc that has the complete current backup as of that date
For a full restore you want three files, the Full Oscar Backup, and the newest database and document files.
Restoring Backup
Restoring from a backup is a technically demanding endeavor and should be done by individuals familiar with linux, databases and the OSCAR program such as the approved Oscar Service Providers.
In order to restore the backup you need to know all the encoding details that were selected during the encryption process otherwise you get an unreadable binary file. The relevant details are
- the cipher used
- the password used (plus the initial vector if applicable)
- if the file was salted (and the salt string if no key was provided)
- the format (eg encoded with -base64) and the padding
- if the documents were stored in a incremental backup
- the version of OpenSSL used to encrypt (not all versions of OpenSSL are compatible with each other)
Assuming you have not deviated from the default, de-encrypt the backup with the following command. eg for the backup files created on Feb 18th, 2019 the parameters will be
openssl enc -d -aes-256-cbc -salt -in Full.OscarBackup.oscar_15.2019-02-01-23:01:01.tar.gz.enc -out FullOscarBackup.tar.gz
openssl enc -d -aes-256-cbc -salt -in OscarBackup.oscar_15.2019-02-18-23:01:01.Document.tar.gz.enc -out OscarDocumentIncrementalBackup.tar.gz
openssl enc -d -aes-256-cbc -salt -in OscarBackup.oscar_15.2019-02-18-23:01:01.Database.tar.gz.enc -out OscarDatabaseBackup.tar.gztar -xzf OscarDatabaseBackup.tar.gz mysql -uroot -p******* oscar_15 < OscarBackup.sqlFor documents you need to decompress the remaining files in the appropriate directories.
tar -pxzf FullOscarBackup.tar.gz
tar -pxzf OscarDocumentIncrementalBackup.tar.gz
Test that you can open the backup and read the contents before you depend on this script.
Demographic Export
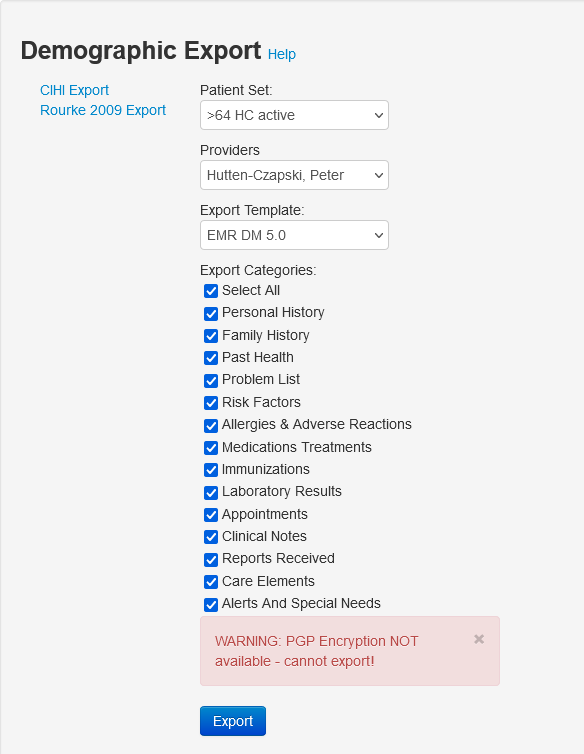
This export is for transferring patient demographic, clinical and administrative data to another clinic, or to another compatible program.
You need to have defined a patient set in Reports > Demographic Report Tool > Run Query and Save to Patient Set or pick a provider for all their patients
The behavior of this utility is controlled by the oscar.properties file and is disabled by default. See PGP on how to disable or configure encryption.
OSCAR will need to temporarily write to the TMP_DIR often set to /usr/share/oscar-emr/OscarDocument/oscar/export/.
It is not recommended to bypass PGP as its important security for patient data, but for testing purposes you can disable the encryption.
CMS aka EMR DM 5.0 Export
The Patient Demographic Export abstracts files from the Electronic Medical Record and exports them in a standardized import export format for Data Migration. EMR DM 5.0 is a standard set by Ontario MD and remains current (2023) although incomplete. In other words there are entries in the database that do not have a corresponding area in the XML file. Examples include but are not limited to demographic Alias, lab comments, forms, eforms , messenger and all billing.
The OntarioMD standard postdates OSCAR and is meant to encompass (post hoc) all certified EMR’s but were not validated against existing data. Thus data previously entered may be non compliant, and difficult to program sensible defaults for.
Procedure:
- Fix any potential data issues (see below for documents)
- Click on the ‘Demographic Export’ (if you do not see this option contact your site support staff for privileges)
- Choose a patient set from the drop down menu that you defined earlier in the Demographic Report Tool. In this case we have selected the list of patient(s) that we labeled ‘>65’
- Alternately pick a provider
- What do you want to export? Usually you want all options checked so ‘Check All’
- Click the Export button to export into either of the two XML formats supported a) CMS spec 5.0 format (OntarioMD) or b) E2E-DTC (BC Pito).
- The zip file can be used to import the patient(s) into another OSCAR or other compatible software (see Import below). Alternately you can open it with a text editor or Firefox (the zip consists of a text file, a log file, and xml file)
NOTE: This export is not useful for large data sets in the authors opinion
- It is database intensive and takes TIME to run and OSCAR will slow down. Allow a minute a patient for decade old mature charts.
- If it encounters errors not all demographics may be present in the output
- If it encounters errors the utility may not faithfully export every detail of a patients chart
TIP A common export error is that a document does not have the “class” attribute. You may have different ways that are useful to you to classify documents than the fixed arbitrary ones provided by OntarioMD. You can fix this potential problem before you run the export with SQL. The sample below hits many of the standard OSCAR document types. Feel free to modify as needed.
UPDATE `document` SET `docClass`='Diagnostic Imaging Report',`updatedatetime` = NOW() WHERE `docClass` = '' AND (`doctype` LIKE '%IMAGING%' OR `doctype` LIKE '%RADIOLOGY%'
OR `doctype` LIKE '%U/S%');
UPDATE `document` SET `docClass`='Diagnostic Test Report',`updatedatetime` = NOW() WHERE `docClass` = '' AND (`doctype` LIKE '%PATHOLOGY%' OR `doctype` LIKE '%PULMONARY%');
UPDATE `document` SET `docClass`='Cardio Respiratory Report',`updatedatetime` = NOW() WHERE `docClass` = '' AND (`doctype` LIKE '%CARDIAC%' OR `doctype` LIKE '%ECG%');
UPDATE `document` SET `docClass`='Medical Records Report',`updatedatetime` = NOW() WHERE `docClass` = '' AND (`doctype` LIKE '%HISTORY%' OR `doctype` LIKE '%DISCHARGE%' OR `doctype` LIKE '%PROGRESS%');
UPDATE `document` SET `docClass`='Consultant Report',`updatedatetime` = NOW() WHERE `docClass` = '' AND (`doctype` LIKE '%CONSULT%' OR `doctype` LIKE '%SPECIALIST%');
UPDATE `document` SET `docClass`='Lab Report',`updatedatetime` = NOW() WHERE `docClass` = '' AND `doctype` LIKE '%LAB%';
UPDATE `document` SET `docClass`='Other Letter',`updatedatetime` = NOW() WHERE `docClass` = '';
CIHI Export
- The CIHI export is another specific format (Canadian Institute for Health Information)
- When this report completes the page will refresh with the generated file name appearing in the list.
Rourke 2009 Export
This export is of the older Rourke 2009 Forms on the system. Most users have migrated to using the newer Rourke 2014 2017 or 2020 eForm.
Import New Demographic

This tool is to import patient(s) who have come from another clinic that uses Oscar, or other compatible software.
- Click on Import New Demographic
- Browse to the file from the other system. It has to be in CMS EMR DM 5.0 spec format. You need to decrypt the file BEFORE uploading. Leave the file zipped.
- Options, if offered usually best to leave at default values
- Import!
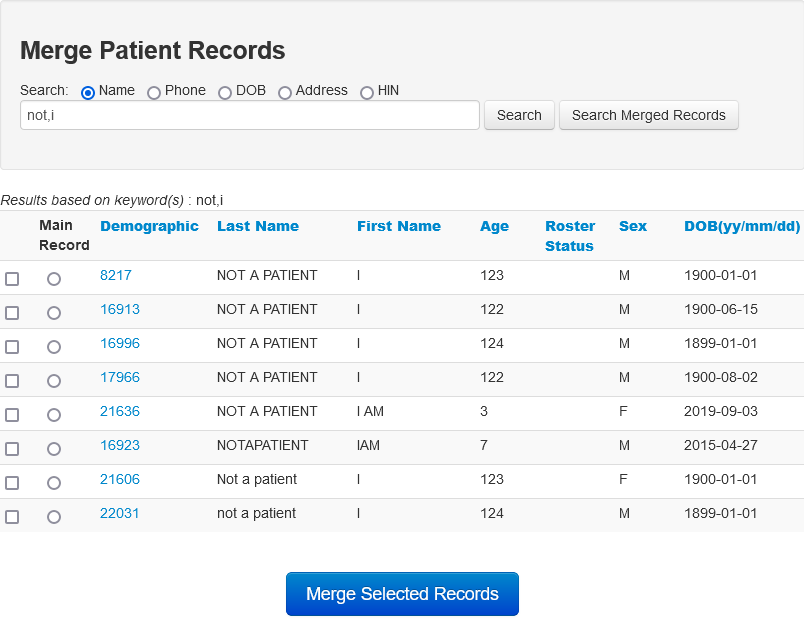
Merge Patient Records
Did you create a duplicate chart? No problem. OSCAR can link the two charts. The merge references one record as associated with the invalid record. The invalid record can be found using the search function of Oscar and when you open it up, it just loads the echart and demographic of the valid demo. Despite the name OSCAR does NOT merge the contents of the files. However in a merged chart you can access both via the MDR by clicking on the desired demo number at the top of the master demographic page
Technically the merge creates a pointer to the valid record and makes reading or writing to the invalid one difficult, by setting a role/object for provider “_all” with all rights denied for that demographic number. Thus if there is information that you want kept (like a valid HIN or an important result!), you should transfer it to the correct record before doing this procedure. Otherwise you may need to un-merge, get the information and re-merge.
- Search normally and then change the demographic name on the invalid chart (eg John Smith -> John Smith-X) so that they are close and you know which chart to keep
- Search again with the merge record facility so that both names are brought up
- Check the check boxes for the ones that you want to merge.
- Click on the radio button for the main chart and
- Then click the button that says ‘Merge Selected Records’
Update Patient Provider
If a set of patients needs to change the Resident, Nurse or Midwife that cares for them, choose from the former and replacement provider, as well as the last name patient range, from the drop down menus. Then, click “Go”.
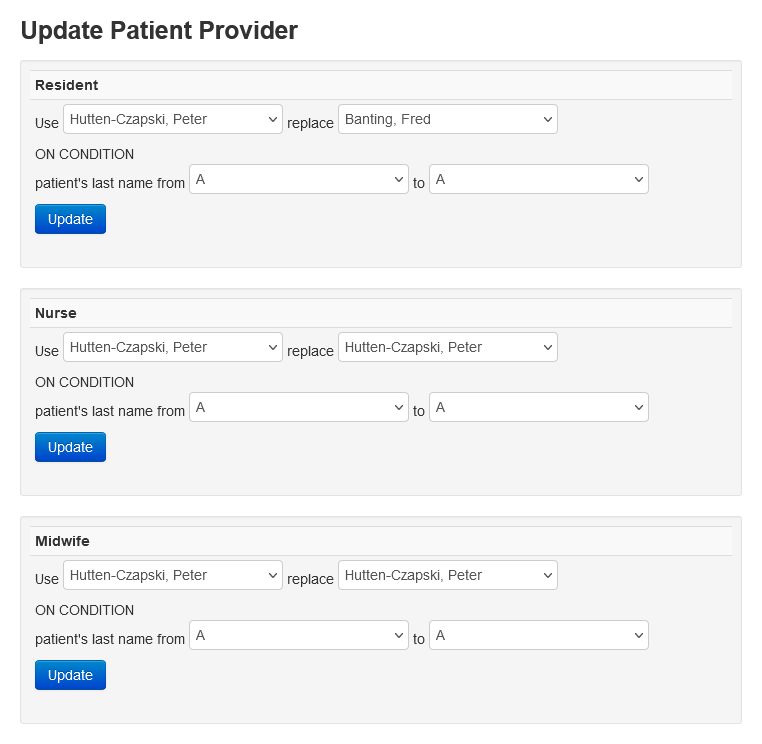
This example replaces the Resident ‘Fred Banting’ with ‘Peter Hutten-Czapski’ for all of the patients with last names ending in A that were previously tagged as those for doctor doe
Product Dispensing

This function is available for those who need to maintain their own formulary from which they can dispense.
Migrate Contacts
Migrate your Contacts to the new system, see Installation for how to use
Fix notes with invalid role
- If you have some notes which have a reporter_caisi_role of 0
- This utility will fix them in a bulk way.
- Make sure you know what you are doing!
Audit Log Purge Tool

OSCAR 15/19 has much more complete logging than OSCAR 12. However after a few tens of millions of rows the log table may start slowing OSCAR down.
To improve performance, a new feature was added to purge the log
- rows are backed up using mysqldump and saved as a sql file directly on the server so the data is not lost
- Allow a Gig of disk space for every 10 million log entries that you purge.
- The purge tool will log it’s own action to the Log identifying the user who runs the tool as well as the purge range
- Identified rows will be removed from log table
- When complete the number of rows deleted will be displayed
NOTE THAT THIS TOOL IS QUITE RESOURCE INTENSIVE
run the utility when no one is using OSCAR as it will slow OSCAR to a crawl
There are 2 modes
- Automatically using a scheduler.
- Manually using the Administration interface.
Note on limitations: This feature is designed for a local database. Do not attempt to use on a remote database as the proper connection data will not be provided to mysqldump, and an error will about the function.
If you are deleting too many rows it is likely that you will get a transaction deadlock caused by collision of the locks in the database from the delete and new locks from transactions that OSCAR is continuing to add to the table. In this circumstance the dump file will be formed but the transaction will be rolled back, effectively undoing the delete and you will not get the “Success. Removed xxxxxxxx records from the audit log.” message. If so you may need to delete rows using the MariaDB console.
Manually purging the Audit Log
There’s some configuration required to use this feature
- In the properties file, you should be sure about your log.purge.minDays property. What this value tells the system, is to not allow the purging of any data which is more recent than the threshold set here. A default of 7 days (a week) is set but you may prefer a larger number to prevent users from the temptation of doing something nefarious and then making it hard(er) for the actions to be noted by deleting the log. If you set log.purge.minDays=30, the feature will never purge data collected within the last month.
- You must give the security object “_admin.auditLogPurge” to users who will be authorized to manually run this function from the administration panel.
- Set log.purge.mysqldump to the location of your mysqldump executable. By default its set to /usr/bin/mysqldump
- Set log.purge.outputdir to determine where the data to be purged will be written to (a mysqldump file). If not set, DOCUMENT_DIR will be used. The file is uncompressed sql
You should be able to go to the Administration Panel, and under Data Management to access the wizard.
If you are purging a hundred million entries this will take a few hours to run. Grab a book.
Automatically purging the Audit Log
Make sure you’ve setup the properties above accordingly. In addition, you will need to set log.purge.daysfromnowtopurge. This value determines how far into the past to purge the audit log records. If you set 365 here (the default), then every time this job runs, it will purge all audit log records older than 365 days.
Setup the job in the Oscar Job interface of the Administrative Panel.
The Job Type class is org.oscarehr.admin.job.AuditLogPurgeJob
Bulk set Custom Allergy Non-Drug flag

Migrates allergies to either drug or non drug. Click the appropriate radio button and save changes (button at the bottom). Note that a maximum of 500 entries are shown at a time. If you have more you have to set at least some of the first set before you get more entries.
Bulk set Dx code in Dx Registry

Adds the given diagnosis to the demographic (by demographic number). The code checks to see if the demographic number is valid, if the diagnosis is already set, and adds it to the registry if necessary
copyright © 2012-2025 by Peter Hutten-Czapski MD under the Creative Commons Attribution-Share Alike 3.0 Unported License