
Customize Measurements
Concepts
Discrete patient data that varies with time is suitable for Measurements. This may include simple vitals such as blood pressure or laboratory values such as A1C. Measurements can be customized in Administration > System Management > Customize Measurements
Measurement Groups
The Groups allow for a panel of related Measurements to be presented to the user in the Measurements tab of the eChart. Groups will include a selection of Measurements for a given purpose. For example a group Vitals can contain the common vitals that may be captured in the encounter. Diabetes can be a group for values of interest in Diabetes and so on.
Adding a Group
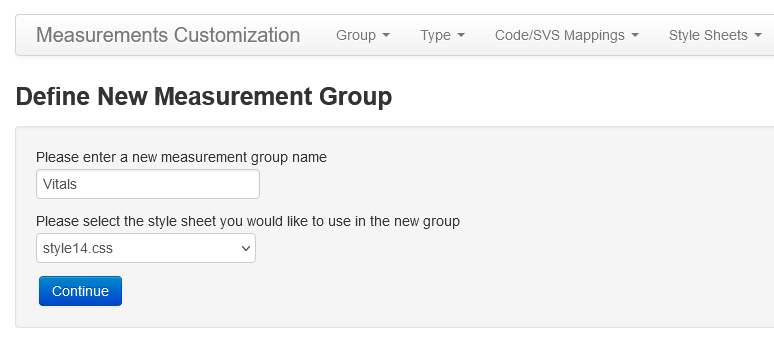
Under the Group Menu you can choose Add to define a New Measurement Group. Enter a new name (eg Vitals). While usually left blank, you can optionally define a Style Sheet to be used with the Group that you have uploaded previously. If you pick a name that is already defined an error message will be displayed.
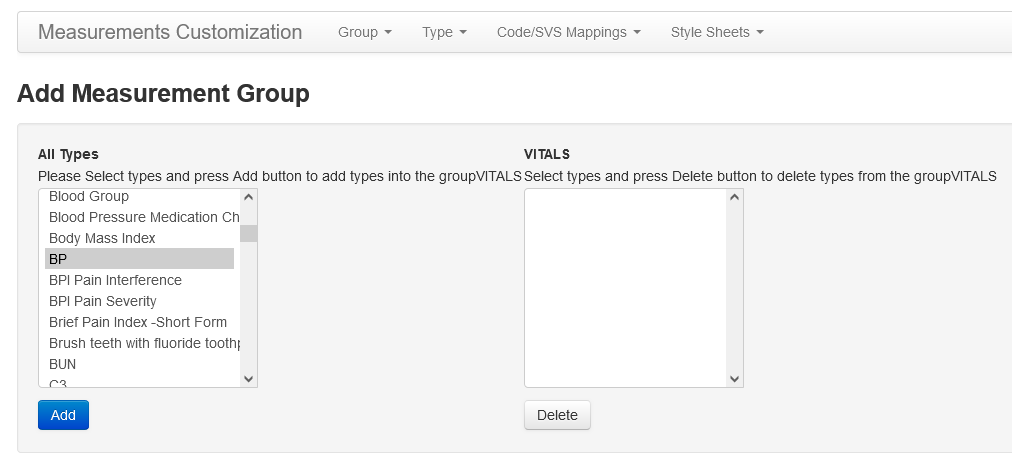
Pick the types you want and click Add to select them for the measurement group. If you select something in error, you can select it in the right hand panel and click Delete to remove the selected measure(s) from the list for this particular Measurement Group
TIP: you can [Ctrl] + click several at a time
Editing a Group

The “Edit” in the Group menu allows you to edit the properties of an existing Group. Select the Group and you can:
- Modify Measurement Types allows you to add and delete measurement types that are in the Group
- Modify Measurement Style allows you to change the style sheet for that Group
- Modify Decision Support for Group allows you to attach Decision support rules to the Group
- Delete lets you delete a Group
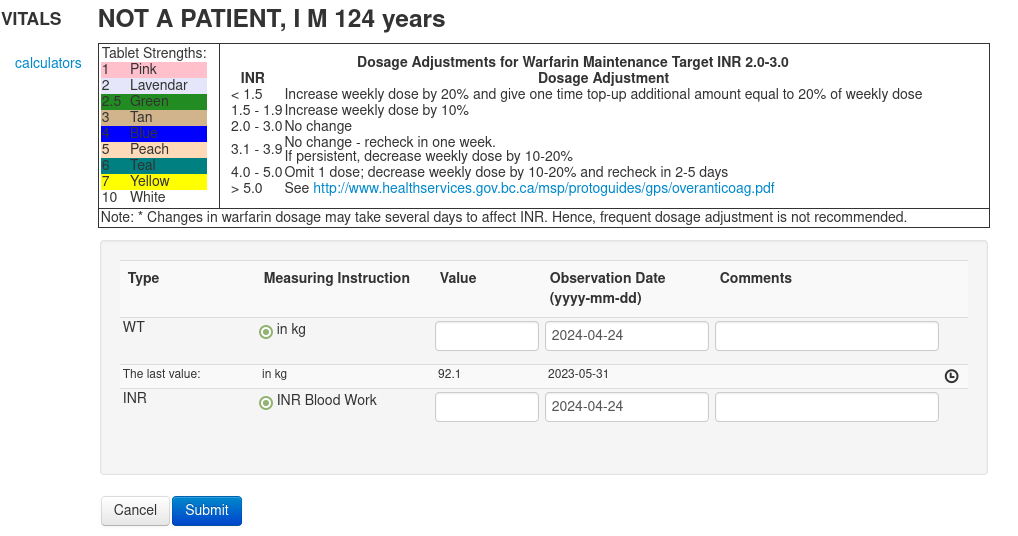
Decision support is currently limited to INR and Physical Function

By adding the INR to the Vitals group the decision support is available when you open that Measurement Group from the eChart
Measurement Types
The Types menu allows you to View and Add types as well as Add Measurement Instructions.
View Measurement Types

The View menu gives you a searchable and sortable table of all the Measurement Types in your system. The default OSCAR 19 system comes with over 400 predefined measurements. Take care NOT to duplicate when you are adding measurements! Note that you can select Types to Delete if you need to, but best to do that only if you have made a mistake and NOT if you have already data saved with that measurement.
Add New Type

If you truly need to Add a new type that is not listed (search for it!), consider checking with other OSCAR forks for existing Types. As many eForms that the community shares use Measurements it is better if you use the same code as others in the community use.
TIPS:
- Try to keep the Type code at 4 characters or less. While OSCAR 19 you can use a code that is up to 50 characters long, many other OSCARs are limited to 4
- The type description can be left blank.
- The display name is what shows in the line in the eChart. Keep it under 16 characters but can be any length in OSCAR 19
- Measuring instruction is usually blank, see the BP measurement instructions below for when this comes in handy.
- Validation. Save yourself future grief and pick a validation that covers all the valid options. If the PHQ-9 maxes out at 27 then 0-50 covers it fine
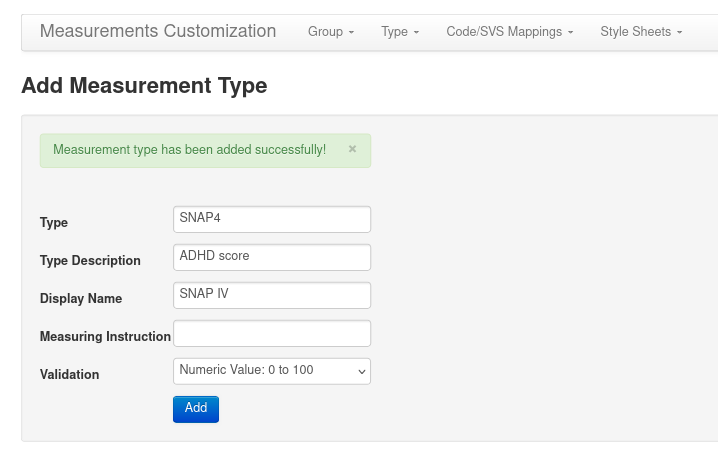
Lets say you want to track the SNAP score on a patient. By following the score over time you will see if your treatments are effective. The Swanson, Nolan and Pelham Teacher and Parent Rating Scale (SNAP) is a 90-question self-report inventory designed to measure attention deficit hyperactivity disorder (ADHD) and oppositional defiant disorder (ODD) symptoms in children and young adults. The 18 question subscale is called SNAP-IV
There is no such measurement on checking and there is a handy eform from the community that uses the SNAP4 type to store this measurement. Lets Add it!
After a successful add you get a message indicating that and you can continue to add Types as you like.
Add Measuring Instruction
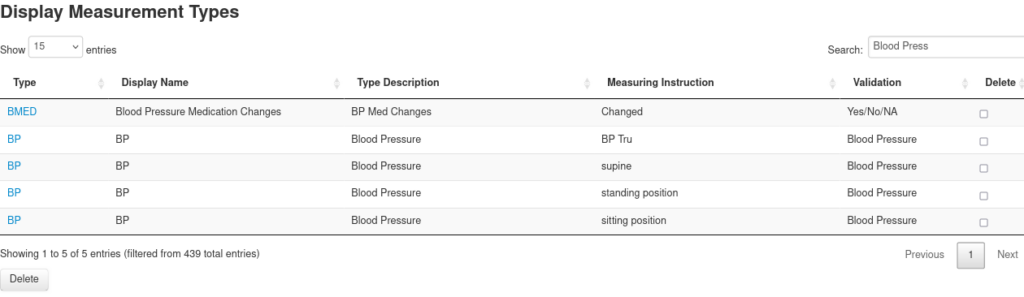
Have you noticed that there are options for measuring instructions for BP? They are all blood pressures but they differ in how they are measured. You can add additional instructions for any Measurement Type with Add Measuring Instructions form
Lets say you want to add summary measures from the Ambulatory BP measurements. You are looking for a 24-hour mean BP of 125/75 mm Hg or less, a daytime BP of 130/80 mm Hg or less, or a nighttime BP of 110/65 mm Hg or less. You can add them

Mapping
Mapping is the connection between a lab value, the LOINC number, and an OSCAR measurement. If the lab value is mapped then the lab value will appear in the eChart’s measurements.
View
To view existing mappings Code Mappings > View will give you a long list. Use the Search to find your entity.

The Map hyperlink will allow you to link the LOINC code with a measurement. This works if your lab comes in with LOINC codes

Right click the Test Name in a result that you want mapped to see if its a LOINC code
eg Glucose-Fasting in a patients result and review the link. javascript:popupStart(‘660′,’900′,’/oscar/lab/CA/ON/labValues.jsp?testName=GLUCOSE-FASTING&demo=1111&labType=HL7&identifier=14768-6’
YES its in LOINC, so just click the map button and its done.
Ah if only all labs used LOINC.
Add Identifier
But how about if the identifier is not a LOINC code and your link looks like javascript:popupStart(‘660′,’900′,’/oscar/lab/CA/ON/labValues.jsp?testName=GLUCOSE-1HR&demo=22222&labType=HL7&identifier=GLU+1HR’ In this case you need to link the (MDS/Lifelabs) identifier to the LOINC first with
Code Mappings > Add
Note that in many OSCAR systems if you have been receiving electronic labs for a while this becomes very slow to open
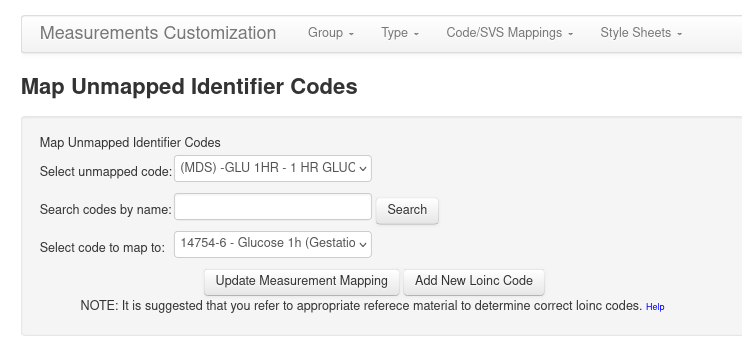
After it opens to reveal this screen you can select the unmapped MDS code that you want mapped and select which LOINC code to map it to.
Click Update and after a while you will get a message “Successfully updated the measurement mappings”
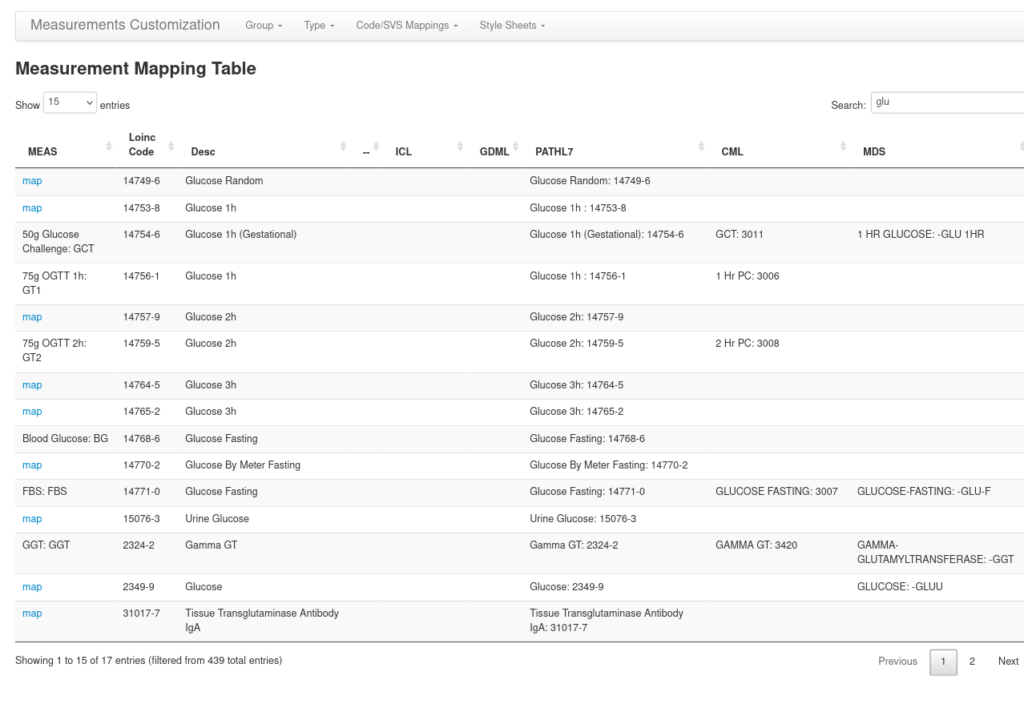
FUTURE labwork from that lab will automatically load this test value into measurements. This can be verified by viewing the measurement mapping table as below. Yes the -GLUC 1HR now maps to the measurement 50g Glucose Challenge with the Measurement Type code of GCT when it didn’t before
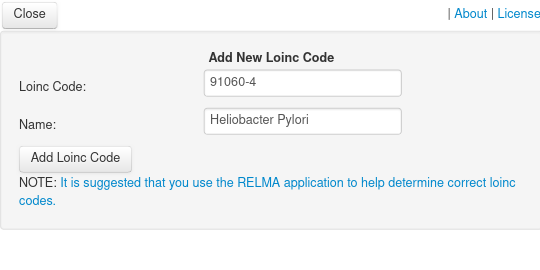
The Add New Loinc Code button opens a popup window to allow you to add a new LOINC code. Use this with care as there are 100,000 LOINC codes and multiple codes for something the clinician may not appreciate the difference but the lab does. eg for Heliobacter there are 8 codes depending on the lab methodology, sample type, and what exactly you are looking for.
Edit Mappings
The Code Mappings > Edit menu item allows you to search and sort all the mappings. Here a search for the LOINC code 14754-6 that we just mapped to the MDS identifier -GLU 1HR. You can Delete it safely although labs values mapped previously will still show up in the GCT measurement type. You can REMAP to a different LOINC

Style Sheets
The default OSCAR 19 bootstrap stylesheet serves in most cases to style the Measurement Group. However you can use custom stylesheets if you want. When you Style Sheets > View you have the option of deleting a style sheet

Style Sheets > Add lets you upload a style sheet

A style sheet could be based on the following
BODY {
FONT-SIZE: Normal;
FONT-FAMILY: Verdana, Tahoma, Arial, sans-serif;
}

TABLE {
FONT-SIZE: x-small;
}

.Header {
font-weight: bold;
background-color: #6699cc;
}

TH {
font-size: small;
font-weight: bold;
}

.BodyStyle {
margin-left: 0;
margin-right: 0;
margin-top: 0;
}

.MainTable {
border-collapse: collapse;
border-color: #111111;
border-width: 0;
padding-bottom: 0;
padding-top: 0;
padding-left: 0;
padding-right: 0;
width: 100%;
font-size: 80%;
}

.MainTableTopRowLeftColumn {
background-color: #003399;
border-right: 2px solid #A9A9A9;
border-left: 2px solid #A9A9A9;
border-top: 2px solid #A9A9A9;
height: 34px;
max-width: 130px;
font-size: 110%;
font-weight: bold;
color: #FFFFFF;
}

.MainTableBottomRowLeftColumn {
border-right: 2px solid #A9A9A9;
border-left: 2px solid #A9A9A9;
border-bottom: 2px solid #A9A9A9;
height: 4px;
max-width: 130px;
}

.MainTableLeftColumn {
border-right: 2px solid #A9A9A9;
border-left: 2px solid #A9A9A9;
max-width: 130px;
vertical-align: top;
}

.MainTableTopRowRightColumn {
border-right: 2px solid #A9A9A9;
border-top: 2px solid #A9A9A9;
background-color: #003399;
height: 34px;
}

.MainTableBottomRowRightColumn {
border-bottom: 2px solid #A9A9A9;
border-right: 2px solid #A9A9A9;
height: 4px;
}

.MainTableRightColumn {
border-right: 2px solid #A9A9A9;
height: 34px;
}

.TopStatusBar {
font-weight: bold;
background-color: #6699cc;
color: black;
height: 23px;
width: 900;
}

.well {
min-height: 20px;
padding: 19px;
margin-bottom: 20px;
background-color: #f5f5f5;
border: 1px solid #e3e3e3;
}

.Header {
background-color: #6699cc;
}

.data {
background-color: #F7F7F7;
}

.note {
font-size: 80%;
background-color: #CCCCFF;
color: #555555;
}
text and images copyright © 2024 by Peter Hutten-Czapski